Showing posts with label Fall. Show all posts

Saturday, November 23, 2013

I'm makin' pies

First you have to play this just to get in the mood…


I don't usually make an abundance of pies during the holidays and 4 is about my limit. In the last week though there just seems to be some many excuses for pie that I've made 7 pies and I have 4 more to make this week! I'm getting good at the home made crust. And since a friend requested the recipe and how to, here we go.

This recipe came from one of Justin's high school friends and I've been using it for over 10 years!


Josh's Homemade Pie Crust
(makes double crust)

2 cups flour
dash of salt
1 Tbsp sugar (omit if you are making quiche or anything savory)
2/3 cup + 2 Tbsp butter or shortening or butter (you should really use butter)
4-6 Tbsp ice water (8 Tbsp if you live in the dry West)

Cut the butter or margarine into the flour until it's roughly pea sized crumbles. (I'm a butter kind of girl. I never use shortening for this and never margarine. It's worth the splurge. You are eating pie for crying out loud, it's not worth trying to keep the lbs off! You will cry yourself to sleep thinking on how good it could have been if you'd only used butter. Just trying to save you the drama of disappointment here.)

Fill up a glass with water and some ice cubes. Dip out the water and add to the dry mixture. Toss it until everything is sort of wet and looks like it will stick together. 

The trick is to not over work the dough. All of those crumbs of butter will melt away in the oven and create little air pockets in the crust to make a delicious flakey goodness. 

Work the dough just enough to get it to stick together while you roll it out. A peel is really helpful if you have one, other wise you have to use more flour. Roll it out and then drape it over your rolling pin and transfer to your pie plate. 

Trim the left over so that the dough hangs about 1/2" over the edges. Roll the draping edges under to rest on the edge of the pie plate. Using your thumb and forefinger on your right hand and your forefinger on your left, push your left finger up against your right all the way around to create a zigzag design. If you look closely, it will have a marbled look to it with the pockets of butter in there!

I learned a long time ago that your pie can be elevated from just yum to spectacular with a homemade crust and decorations for the top. Use the left over dough to cut out shapes to place on top of the pie when it's done. They can be baked on a cookie sheet until lightly brown and crispy and then used on top after the pie is finished baking (unless you are using a lot of them for a fruit pie, in which case you can bake them with like a top crust.

Brush the pie crust and the decorations with a little 1/2 & 1/2 and dust with sugar before you put it in the oven.

Bake for 15 min @450 and then 15 min at 350 if you are planning to use it for a cream pie or something that doesn't get baked after filling. Otherwise, just fill it and bake it with your pie. Cover the edges before they get too brown if your filling isn't done when your crust looks finished.

Have fun!


Tuesday, October 22, 2013

Honor & Strength & a Big Imagination


My little warriors asked to be Spartans this year for Halloween. Only problem is that Spartans pretty much wear nothing more than a pair of leather undies and a red cape. Precisely why my youngest found this so appealing! 

Even if we could get past the idea of basically streaking through the neighborhood for Halloween, which might work in Georgia, we happen to live in Colorado where we could easily have 6" of snow on the ground by All Hallows Eve! Tighties and a cape aren't gonna fly.

All I could think of doing to warm them up, was to buy a muscle suit until I ran across a tutorial for this. Can you say GENIUS?!?!

I'm not gonna lie. I looked at all of the pictures and then sort of made it up as I went. A scrap piece of material, stuffing, layered it inside  50 cent t-shirts from the thrift, drew lines with a ruler and sewed along the lines. Much easier than all that cutting!  I added a little darker color paint to the creases and added a belly button and I was a hero

Ok so I wasn't a hero. The 6 year old woke up the next morning with a huge grin on his face scrambling to try it on and the 8 year old said, "I'm so not gonna wear that!" (Are we seriously there already?!?) Oh well. We can layer real clothes under all of this and it will only make them stronger looking!


Cereal boxes, elastic, glue gun applique and some bronze spray paint. I learned this from some over the top, overly creative helmet how to on instructibles


So I ordered the shield/sword combos which were totally worth the $12 on Amazon and the Spartan helmets which were totally NOT worth the $12 on Amazon and ended up being pretty cheap. 


"Honor and Strength" is the saying on the shield. I think these were so cool with the spot for the sword to fit into the shield. You know like for when you are marching and you need to carry a spear too...


Choir robes from thrift for the capes.


And a cut up leather skirt that my mother sent me (Sorry mom. I looked for Annie Oakly accessories to go with it to no avail but I still got three Spartan costumes out of it!)


Curtain rods from thrift. And I might add, the 8 year old is taking this picture pretty seriously even though he said he'd never wear those muscles...


You might be asking, where is the third Spartan? He is actually going to be a Roman soldier (so they have someone to fight, naturally) and since he already has bulging muscles I didn't make him a muscle shirt and I am totally making him wear the leather briefs version of the bottoms! (That will have you checking back for another post! He he.) And as you might imagine, he's not really all that in to dressing up on random nights more than a week before the big candy binge and sparing in the courtyard in front of a bunch of college students. 

Happy Halloween!


Tuesday, November 6, 2012

Roasted Vegetable Primavera

I just ran across a new vegetarian recipe in a book my mom sent me that is awesome and easy. I thought you ladies might want to try it on the family so here it is.

1 butternut squash, peeled and cut into 1/2" pieces
2 zucchini, cut into 1/2" pieces
3 carrots, sliced into coins
1 large red onion, cut into 1/2" pieces
1 red and 1 green pepper, cut into 1/2" pieces
4 roma tomatoes cut in half
1 large container of mushrooms, cut in half
(sweet potatoes and broccoli might be good, just use what you like and have on hand if need be)

Put them all on a shallow baking dish and toss with olive oil, seasoned salt and any kind of mixed herb bled you might have. A little oregano and rosemary would do too.

Roast at 400 for 1 hour, turning and mixing a few times. Turn the broiler on for the last few minutes to brown things up.

Take the tomatoes, pull off the skins and put in a blender with 1/4 cp olive oil, 1/4 cp raspberry vinegar (or you can just use that Brieanne's dressing which is what I did), 2 tsp mustard, salt and pepper and puree it.

Toss the veggies with prepared fettuccine noodles and pour the sauce over top. Stir to combine and garnish with parsley if you have it. WALA! SO easy, SO seasonal, and pretty darn healthy!

Tuesday, October 30, 2012

The Giant Creepy Crawlies

We took this and this...

coated it in this...

and got this!

Creepy Scorpion Aeneas!

With lots of black spray paint, duct tape and recycled cardboard, we have Dung Beetle Patrick!

We are ready to Trick or Treat Baby!

I hate bugs but these guys have me totally smitten! And I am coming around. I actually stopped the other day on a run to pick up and play with a tarantula! I even considered constructing a preying mantis costume for myself but I'm too tired. Maybe next year!
Happy Halloween!

Friday, October 26, 2012

Halloween Fiasco

Every year I am more and more amazed at what sorts of costume ideas the boys come up with. They have an uncanny ability to think outside of the box and are very specific with what they have in mind. It's taken me 2 weeks to accomplish this years ideas but I can finally say that I am finished and I laugh to myself every time I pass them in the hall. I am the kind of mom that can yes, pull off most anything they can some up with however I am not your typical sewing master. I am more of your go to the dumpster and thrift to see what kind of trash and recycled things you can make your costume out of. I'd like to say it's because I am so environmentally conscious but it's probably more along the lines of being too cheap to pay for the fancy cloth or pre-made costumes!

This year's costumes are a riot but since I have yet to get them in a picture of them, I thought it would be fun to see what the boys came up with in the past years. Stay tuned, because pictures of this year's project is coming!

At four, Patrick said to me one day, "I want to be a basket ball goal for Halloween." I hesitated for a moment but with the help of a coworker, we managed to come up with and idea on how to execute. Aeneas went in a borrowed skunk costume which was a perfect fit given his personality.

Our first year in Durango, Patrick wanted to go as an "eagle where you look out of the mouth." So I purchased a jacket that we could use later and had about $3 into the felt. Used an old pillowcase for the "bald" of the bald eagle. Aeneas used our kitchen dress up stuff and just carried a little silver pot to get his candy in stirring it along the way. He would dump it each time into the larger pumpkin we were carrying for him. He got double candy for being so dang cute.

This was one of my favorite years. Aeneas, now that he could talk, wanted to be a "cat with green eyes." Thank goodness for college students that helped with the makeup on that one. Patrick insisted on being a T-rex skeleton! I had about $2 into the 3 poster boards, an old pair of tights that I used for the tail and stapled all of the bones onto a sweatsuit he already had!

Patrick wanted to be a pumpkin this year and I managed to find one for $10 at the thrift store. We tied green pipe cleaners into his hair. Aeneas went as a bubble wrap ghost floating around the neighborhood.

Just coming off of our first summer of reading Harry Potter and the Hobbit, wizards were in store. Capes and hats from the $ store and a wig made into a beard.

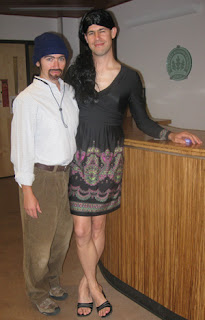
This was a particularly scary Halloween because Justin went as me! He shaved his legs and taught all day with boobs and long hair to which a number of his students left class claiming it to be just too disturbing to stay! He never even complained about his heels all day!

Tuesday, September 18, 2012

Abundant Autumn Apples, by Anna

With close to 200 lbs of apples and 5 days of running 3 crockpots, a huge stew pot and a canner nonstop you too can have 8 gallon freezer bags plus 36 quarts of canned applesauce, 5 apple hand pies, and a baked apple french toast! The boys quote of the weekend? "Put me to work, Mom!" We've been busy! I love this time of year. I don't know what we would do if we actually owned our own apple tree! Thank you Fort Lewis College!